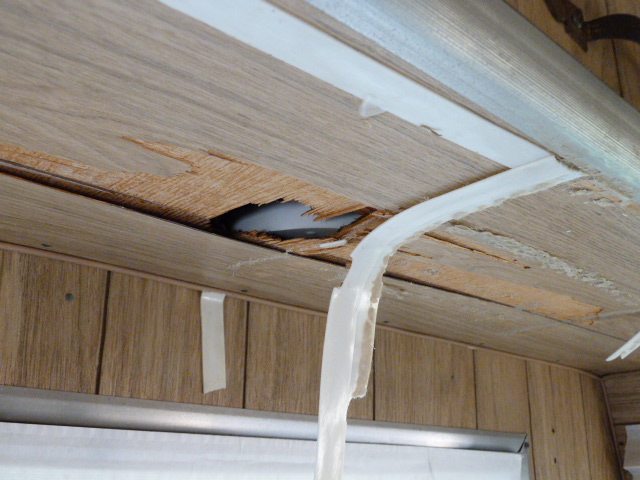
It's just about Thanksgiving, 2011 and I am out on a medical leave for about a month. Feel too crappy to really DO anything to the trailer except plan. I've taken a few photos of problem areas in the interior that I need to address...this water damage is located in the front where the main bed area/couch is located. Most likely, there will be much more water damage found when we pull the front skins off, so this wood will probably be replaced. If not, I'll clean this foam glopp off and paint the paneling wood a neutral color. The shelf above this area has more water damage, and will be sanded and painted.
Next photo...
This is above door area. Will fill in with wood putting and that's about it. Or I can pull this same wood from one of the galley drawer bottoms and tack it over the damaged wood. Not a big worry here.
Next photo:
The Aristocrat Company used these funky plastic shade lights in their 60's and 70's trailers and many have broken plastic shades, unless you are very lucky. I've already placed an ad on Craigslist looking for replacements and will comb Ebay. Most likely, I will pull the good one from the bathroom, put it here above the galley where there is more foot traffic and replace the one in the bathroom with a different design. These are nice lights because they have electrical outlets included in the base. Oh yes, I will sand, primer and paint the base to cover up the rust and deterioration of the metal. The corrosion is a bit more advanced to forego primering and painting.
Next photo: This is a typical problem with vintage trailers kept where it's damp. Rusting and corrosion of the cabinet hardware. This isn't bad, so I will just remove and either soak in Naval Jelly or use steel wool to clean up. Then primer with Rustoleum and paint. They will look like new in a couple of hours.
Next photo:
Yowsa, I hate replacing screens, but this one is small. I'd buy replacement screen material, either in metal or plastic, use my screen roller and buy the appropriate sized screen replacement spline. You have to make sure to pull taut on all sides, so make sure to position on the screen material with alot of overlap. You can trim it off with an exactor knife or razor blade when satisfied with how it looks. Doing a screen sized door would be much more challenging to get taut...this won't be bad.
Next photo:
Yep, this is ugly. And a challenge unless you have two people working on it. I think the best way to handle this (other than taping a rattan placemat over it like the previous owner did...a quick fix but it worked! A black widow spider was hiding under there and kept running in and out to check for food until she met her demise) is to pull the whole cabinet (this is where two people come in) and cutting and replacing the bottom and rear panels. Someone had punched holes in both the rear and bottom, maybe to install an air conditioner? They did a terrible job... I would use paneling from Home Depot, and because the light colored paneling is so hard to find, will most likely paint it a nice similar color or if the replacement paneling color is similar, leave it alone. This is a major storage area, so this one is important to repair right. I do like the idea of putting an a/c unit here, if feasible.
Next photo...
This hole is located in that same cupboard above the dinette. The hole goes through the side trailer skins. Previous owners put up a vent grate there, but water can easily enter through the vent. Will either cut a piece of aluminum, putty the edges and rivet it on to cover or will replace with a better vent grid, if we can install an a/c unit in this cupboard, which is very iffey due to the small depth.
Next photo:
Rust stains on floor...there is no way to remove this big stain, not even with ZUD cleanser. Best options, thrown a rug over it or replace or cover flooring. Most of the flooring is very good, so most likely will do the throw rug strategy.
Next photo:
Cooked, crumbly bed foam and rotten upholstery that smells musty. No salvaging this for sure. My thrifty fix for this main couch/bed was to purchase a twin sized futon mattress, 6" depth from Overstock.com for $105 (includes shipping!). I might have ordered a double sized futon mattress but it would have stuck out a 4 inches more than the original cushions. If my hubby and I are camping, I have an extra piece of foam in one of our other trailers I can fit in there to make it a double bed. The new futon mattress really freshened it up and it came in a natural color cotton duck fabric. Will probably make a washable cover for the mattress but maybe not!


 Tiki fabric curtains
 My 50's hula girl lamp with replacement shade and basket
 Couch area
 Vintage Hawaiian black velvet painting
 See what a difference a little paint makes?
 Pulling the colors together
 A $5 thrift store find!
 Isn't this a great print and frame??
 New foam wrapped in dacron
 A sunny day in December looking towards back
 Tiki candles found at thrift store
 Old cruddy cushion has holes on other side
 The bar is a plus in this trailer
 Vintage Hawaii tablecloth
 Little touches for the bar area
 Out with the old...
 In with the new...futon bed that is.
 Here's the fabric I bought for the dinette cushions and if any left over, maybe a cover for the futon mattress.
 Galley area
 Humphrey's propane light
 A smiling wahine! (pronounced waheenee)


 I won't use the bamboo valances, just fabric.